Mech-Mind Robotics has announced the official release of Mech-Eye UHP-140, the all-new industrial 3D camera with micron-level accuracy.
Mech-Eye UHP-140 is specially designed for demanding inspection and measurement applications in automotive and other industries. It can be used to inspect or measure position, gap, and segment difference in auto parts manufacturing and assembly processes.
Combing with the advanced self-developed optical technology and intelligent algorithms, Mech-Eye UHP-140 features micron-level accuracy. It can deliver outstandingly high-quality 3D images even for polished, shiny, and highly reflective parts.
It doesn't matter when it comes to complex parts, material variation, glossy paint with high brightness, and reflective metal parts that may cause severe interferences for optical inspection performance. Mech-Eye UHP-140 can cope with the above challenges, expand the quality inspection & monitoring capacity, and help automotive and other industries achieve high-quality manufacturing.
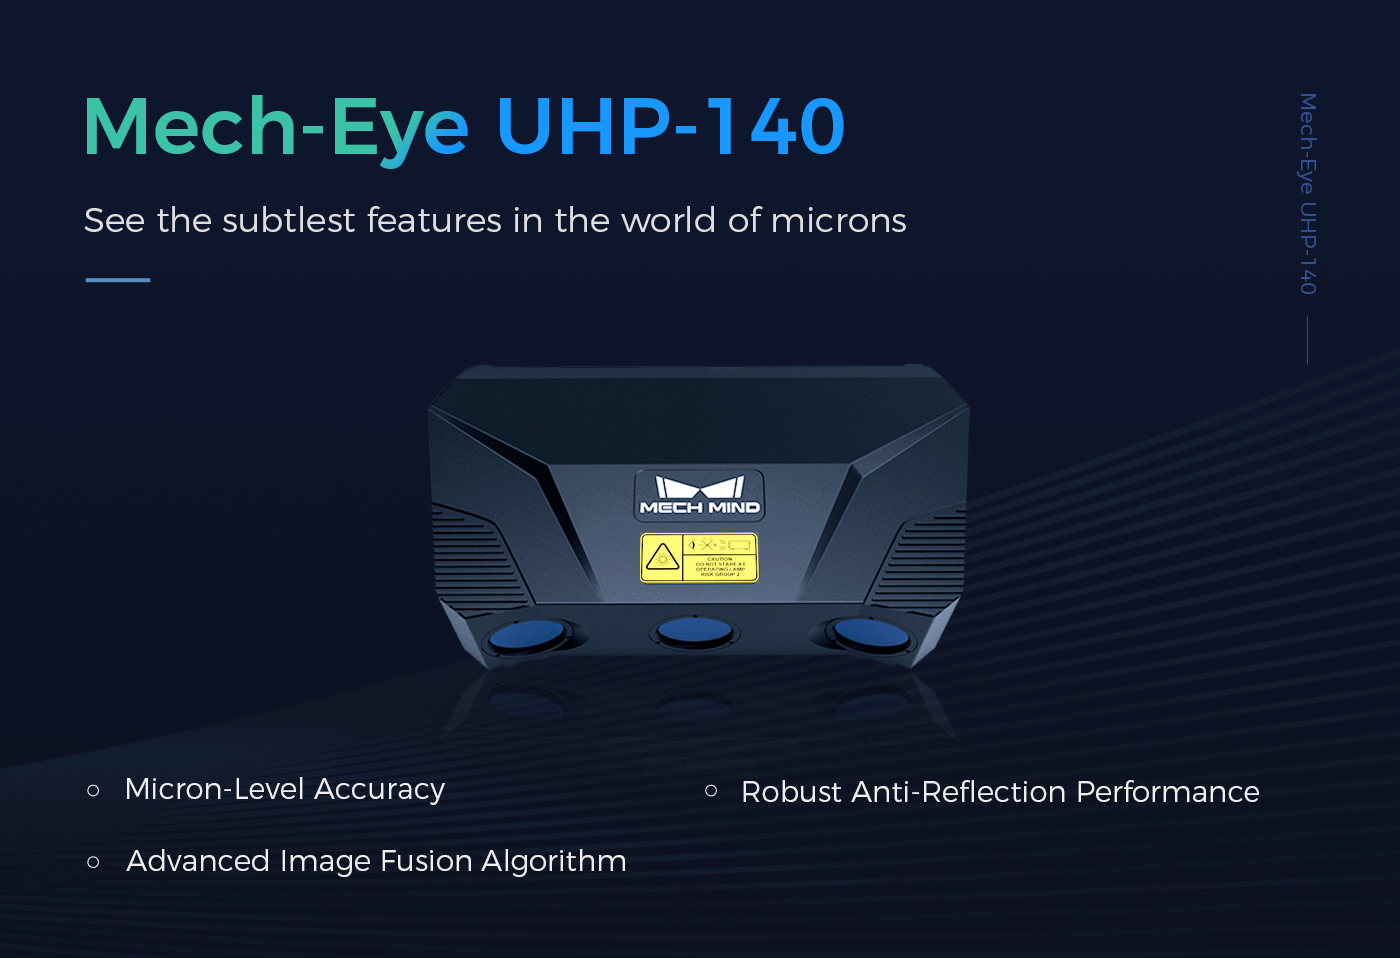
As the first product of the Mech-Eye UHP series, Mech-Eye UHP-140 has been successfully deployed in multiple applications in many automotive OEMs worldwide.
Product Features
01
The All-New Self-Developed Image Fusion Algorithm That Effectively Reduces the Blind Spots and Delivers Much More Outstanding 3D Images
With the advanced image fusion algorithm, Mech-Eye UHP-140 can effectively fill the blind spots of the monocular camera and generate detailed and accurate point cloud data for parts even with subtle visual blind spots.
In inspection and measurement applications of the automotive industry, even the subtlest errors can affect the precision execution of assembly. Take round holes, the most common positioning holes in the body assembly, as an example. Round holes create chamfers during the machining process, and the chamfers on their edges are in the visual blind zone (the width usually ranges from 0.1 mm to 0.6 mm), which poses a challenge for traditional cameras to provide complete and clear images.
As shown in the figure, the point cloud data of round holes collected by Mech-Eye UHP-140, compared with that captured by the monocular camera, deliver complete and accurate 3D information of the slight chamfer in the visual blind zone with fine details.
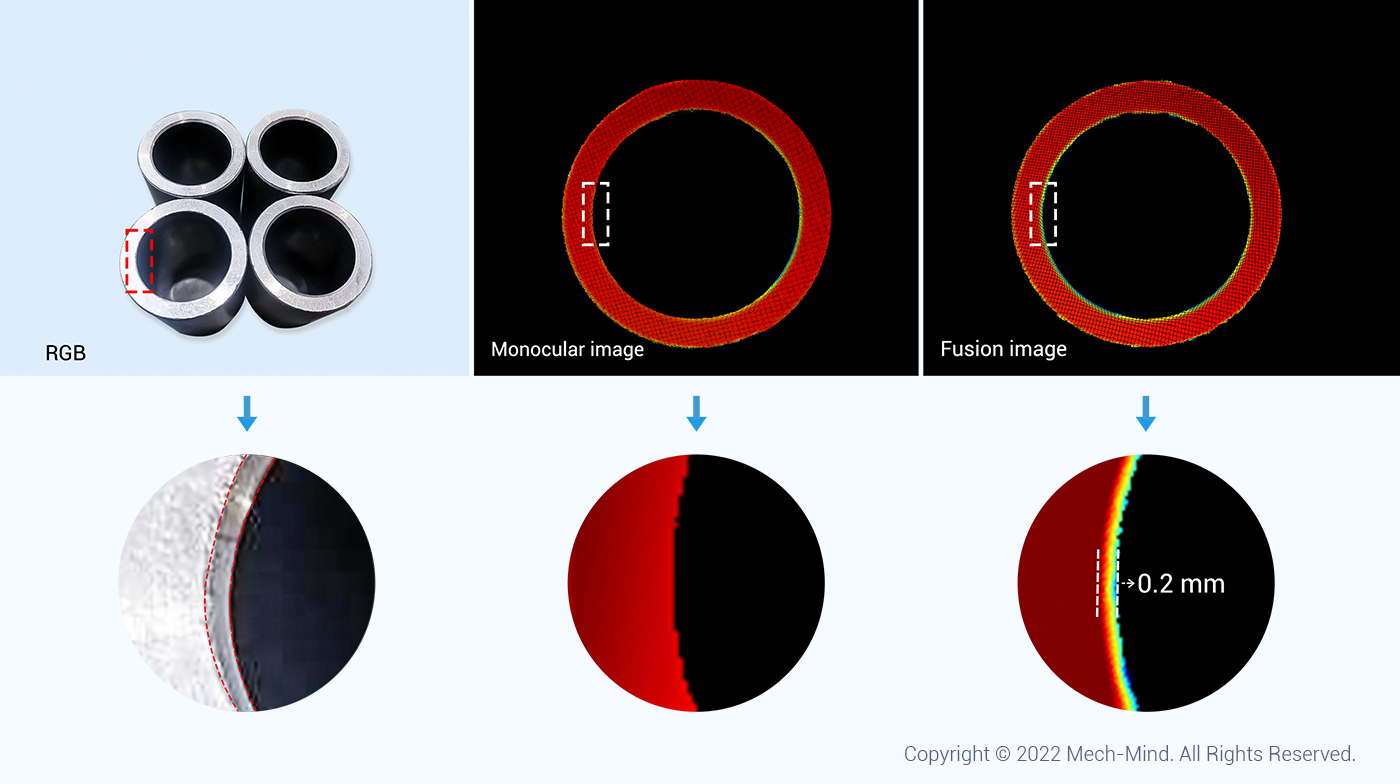
Round positioning hole with chamfer
Mech-Eye UHP-140 @ 0.3 m, point cloud rendered by height
02
The Next-Generation Anti-Reflection 3D Reconstruction Algorithm to Avoid Missing or Defective Point Clouds of Complex-Shaped and Reflective Parts
For various highly reflective dented parts and metal parts that are easy to scatter light, the traditional algorithm can solve the problem of high surface brightness by adjusting the exposure parameters and capturing from multiple angles. But still, it is often difficult to find the right angle for complex-shaped and reflective parts to take clear images.
The Mech-Eye UHP-140, which adopts the advanced anti-reflection 3D reconstruction algorithm, can effectively suppress the interference caused by complex-shaped parts and strong reflections, guaranteeing high-quality point cloud data output. Mech-Eye UHP-140 can better handle complex parts, material variation, and other sophisticated situations in automotive inspection and measurement applications.
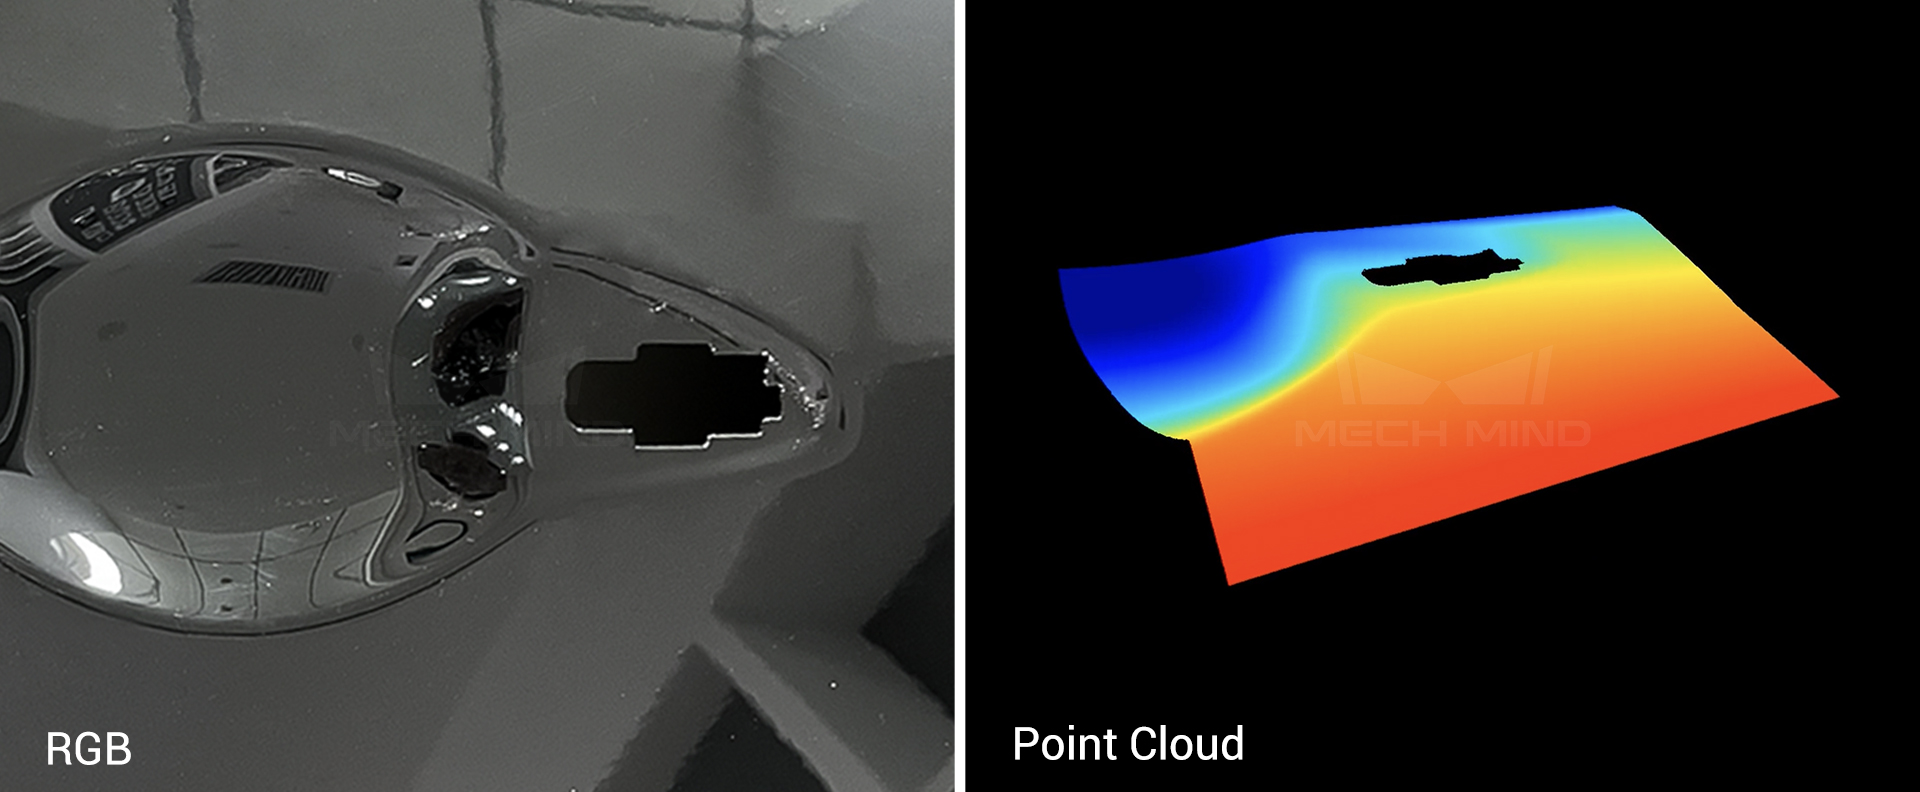
High brightness dented lacquered auto door; the handle position is easy to scatter light
Mech-Eye UHP-140 @ 0.3 m, point cloud rendered by height
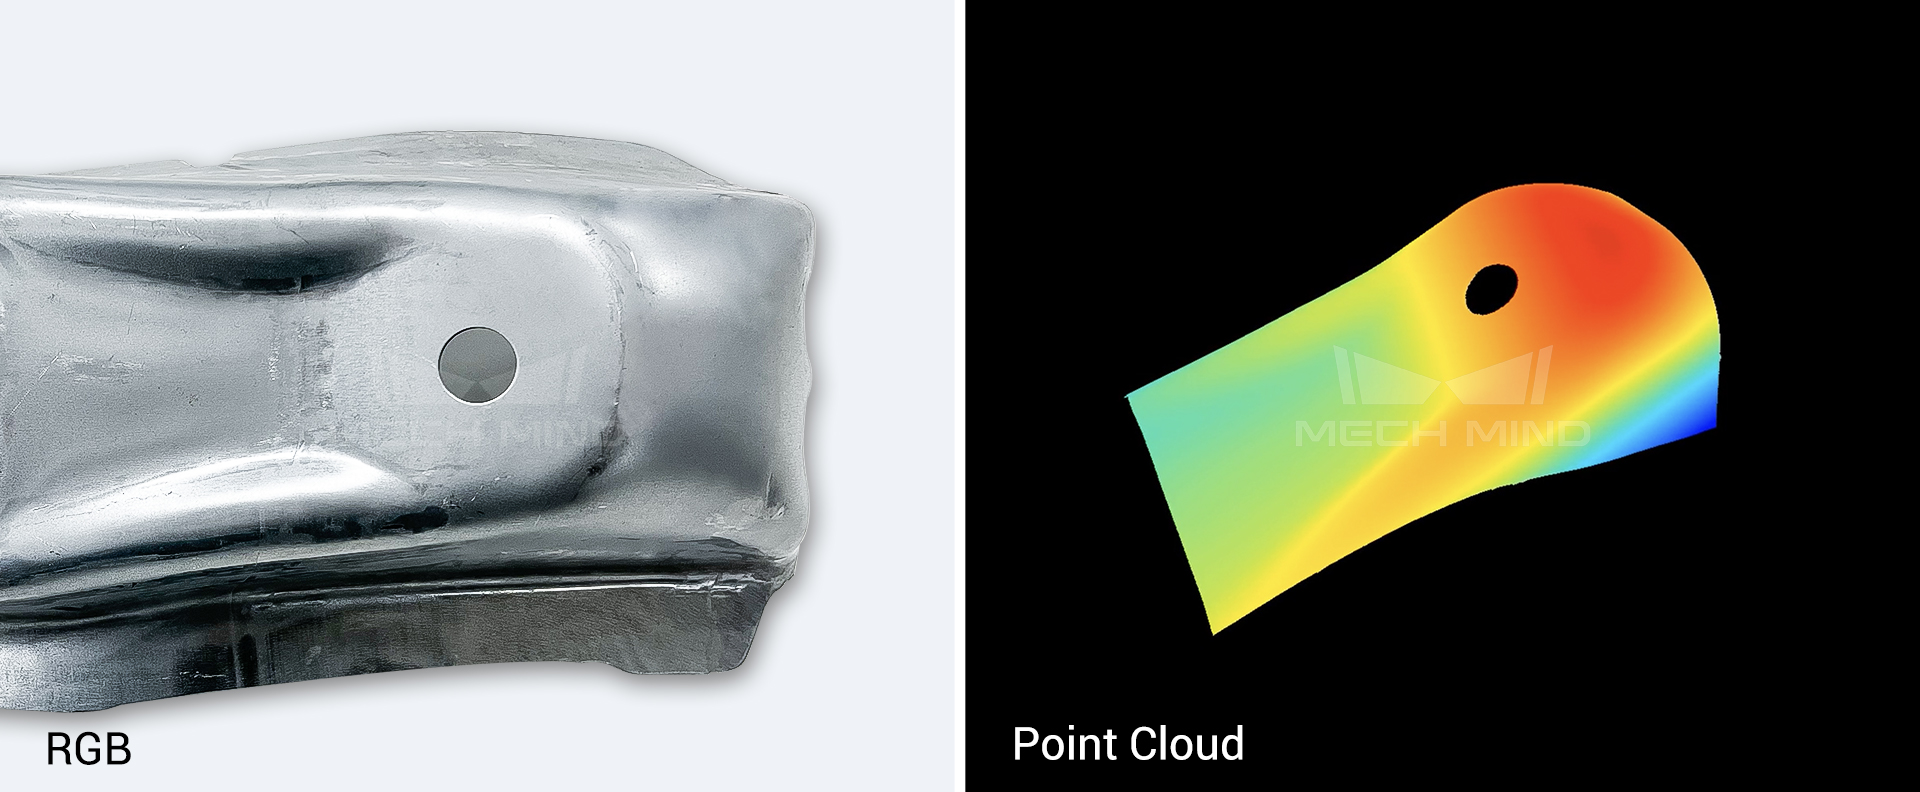
Reflective dented sheet metal part
Mech-Eye UHP-140 @ 0.3 m, point cloud rendered by height
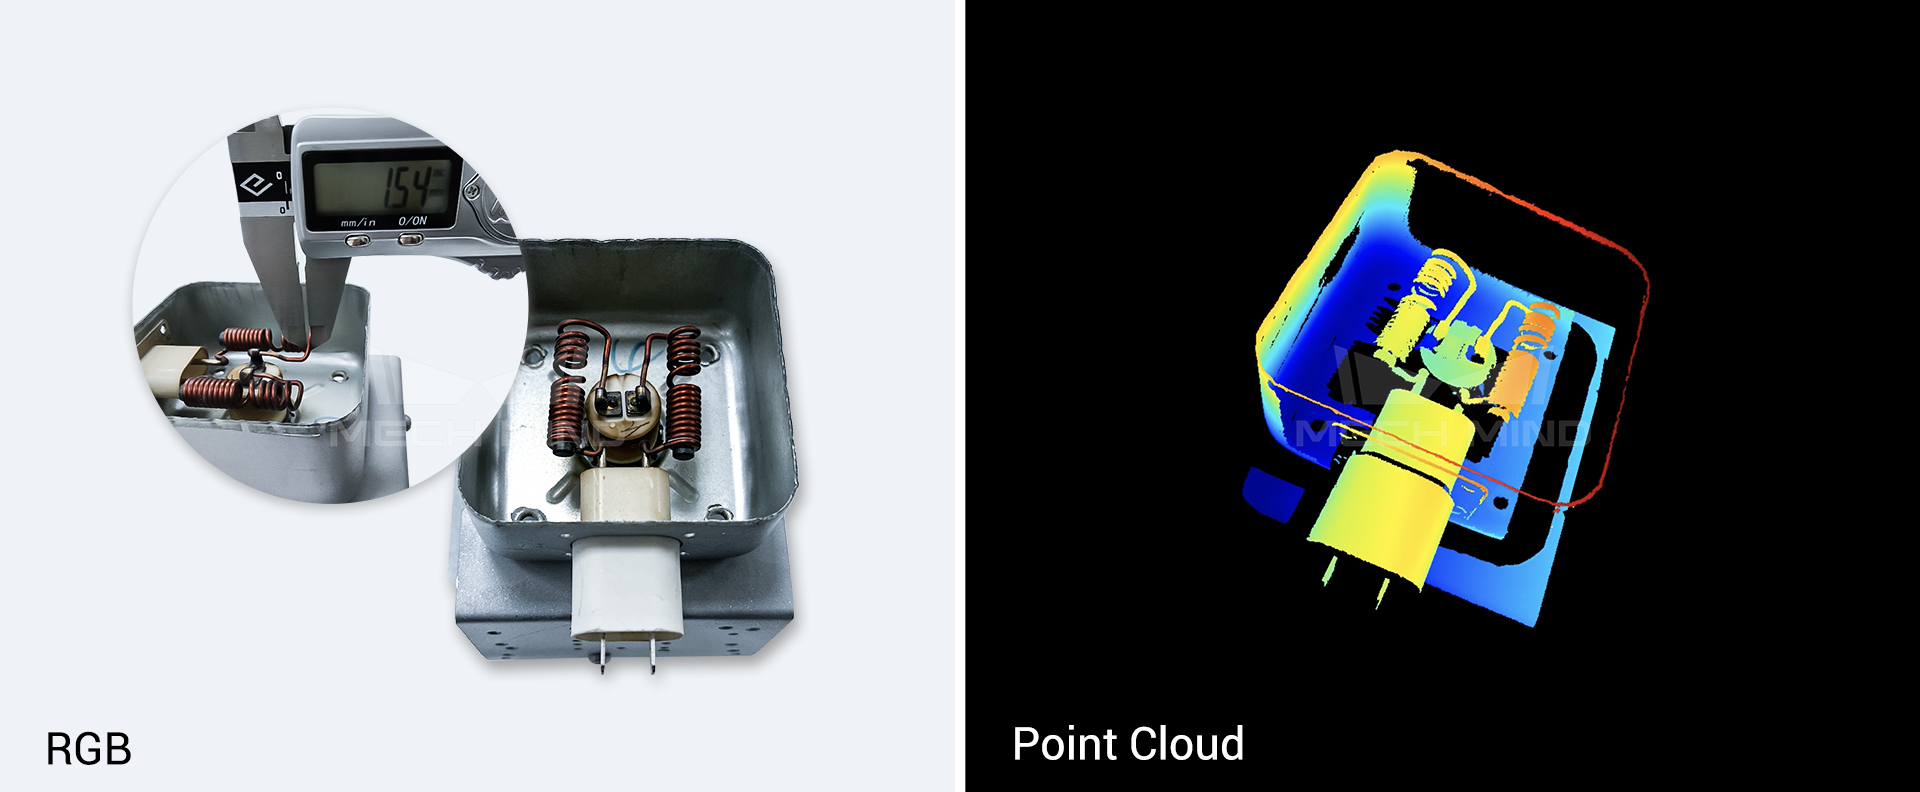
Reflective enameled copper wire with a diameter of about 1.5 mm
Mech-Eye UHP-140 @ 0.3 m, point cloud rendered by height
03
Advanced Optical Design for High Measurement Accuracy and Stable Imaging
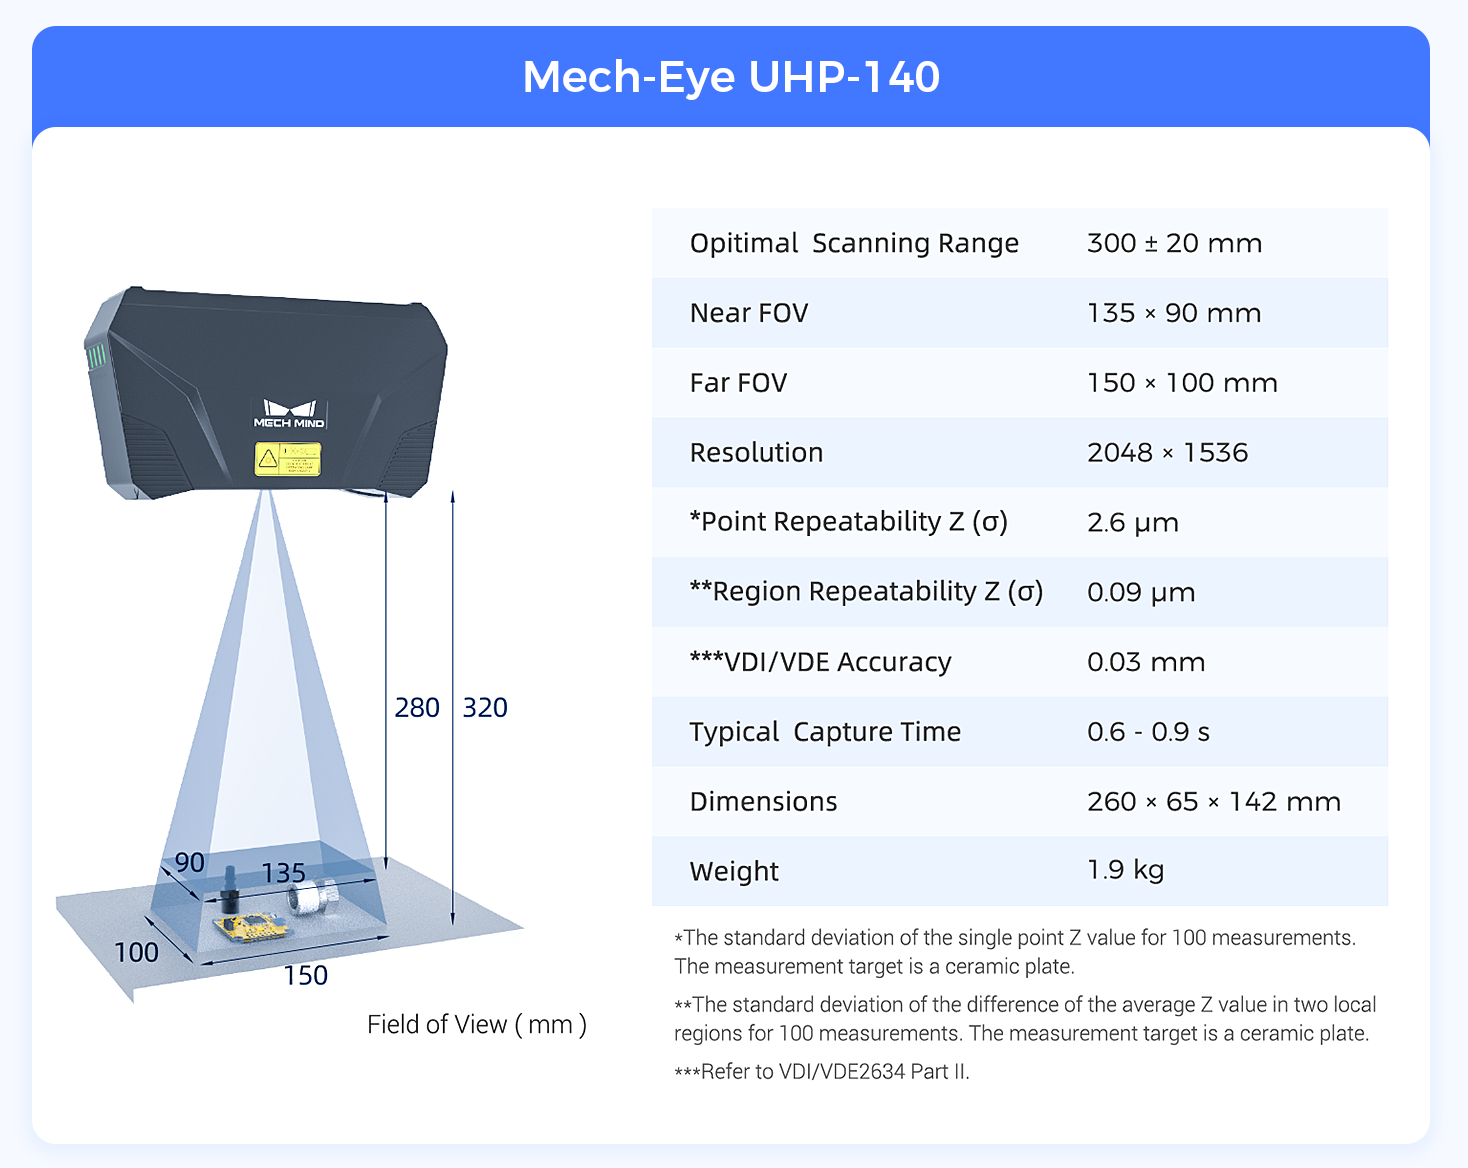
After long-term field research at customer sites, Mech-Mind found that in typical applications of automotive and other industries, the accuracy of inspection and measurement is extremely demanding. Mech-Eye UHP-140, based on the advanced optical design, makes it all possible that its lens distortion is only 1/5 of the traditional lens, and its accuracy reaches 0.03 mm (refer to the German VDI/VDE 2634 Part II standard). The 2.6 μm point Z repeatability (σ) and the 0.09 μm region Z repeatability (σ) ensure Mech-Eye UHP-140 can output ultra-high precision inspection and measurement results with a fulfilling scanning speed and high-quality imaging that meet the actual demands.
04
Compact & Lightweight Design and Open Interface for Rapid Deployment of Various Inspection and Measurement Applications with High Flexibility
Mech-Eye UHP-140 is compact and lightweight, which can reduce the robot payload, and is suitable to be installed at the end of the robot arm to handle inspection and measurement problems in automotive parts manufacturing and assembly with high flexibility. Mech-Eye UHP-140 provides multi-language and multi-platform SDK options and an open interface for easier deployment. It integrates with Mech-Vision graphical machine vision software and Mech-Viz robot intelligent programming environment to easily and quickly deploy various inspection and measurement applications.
05
Industrial-Grade 3D Camera That Better Meets Real-World Challenges
Mech-Eye UHP-140 adopts aluminum alloy housing with a fully enclosed design. It's IP65 water and dust proof, and has passed CE, FCC, VCCI, and RoHS international certifications. Mech-Eye UHP-140 can cope with dust, vibration, humidity, electromagnetic interference, high temperature, and other harsh environments.
Product Specification
Implemented Application
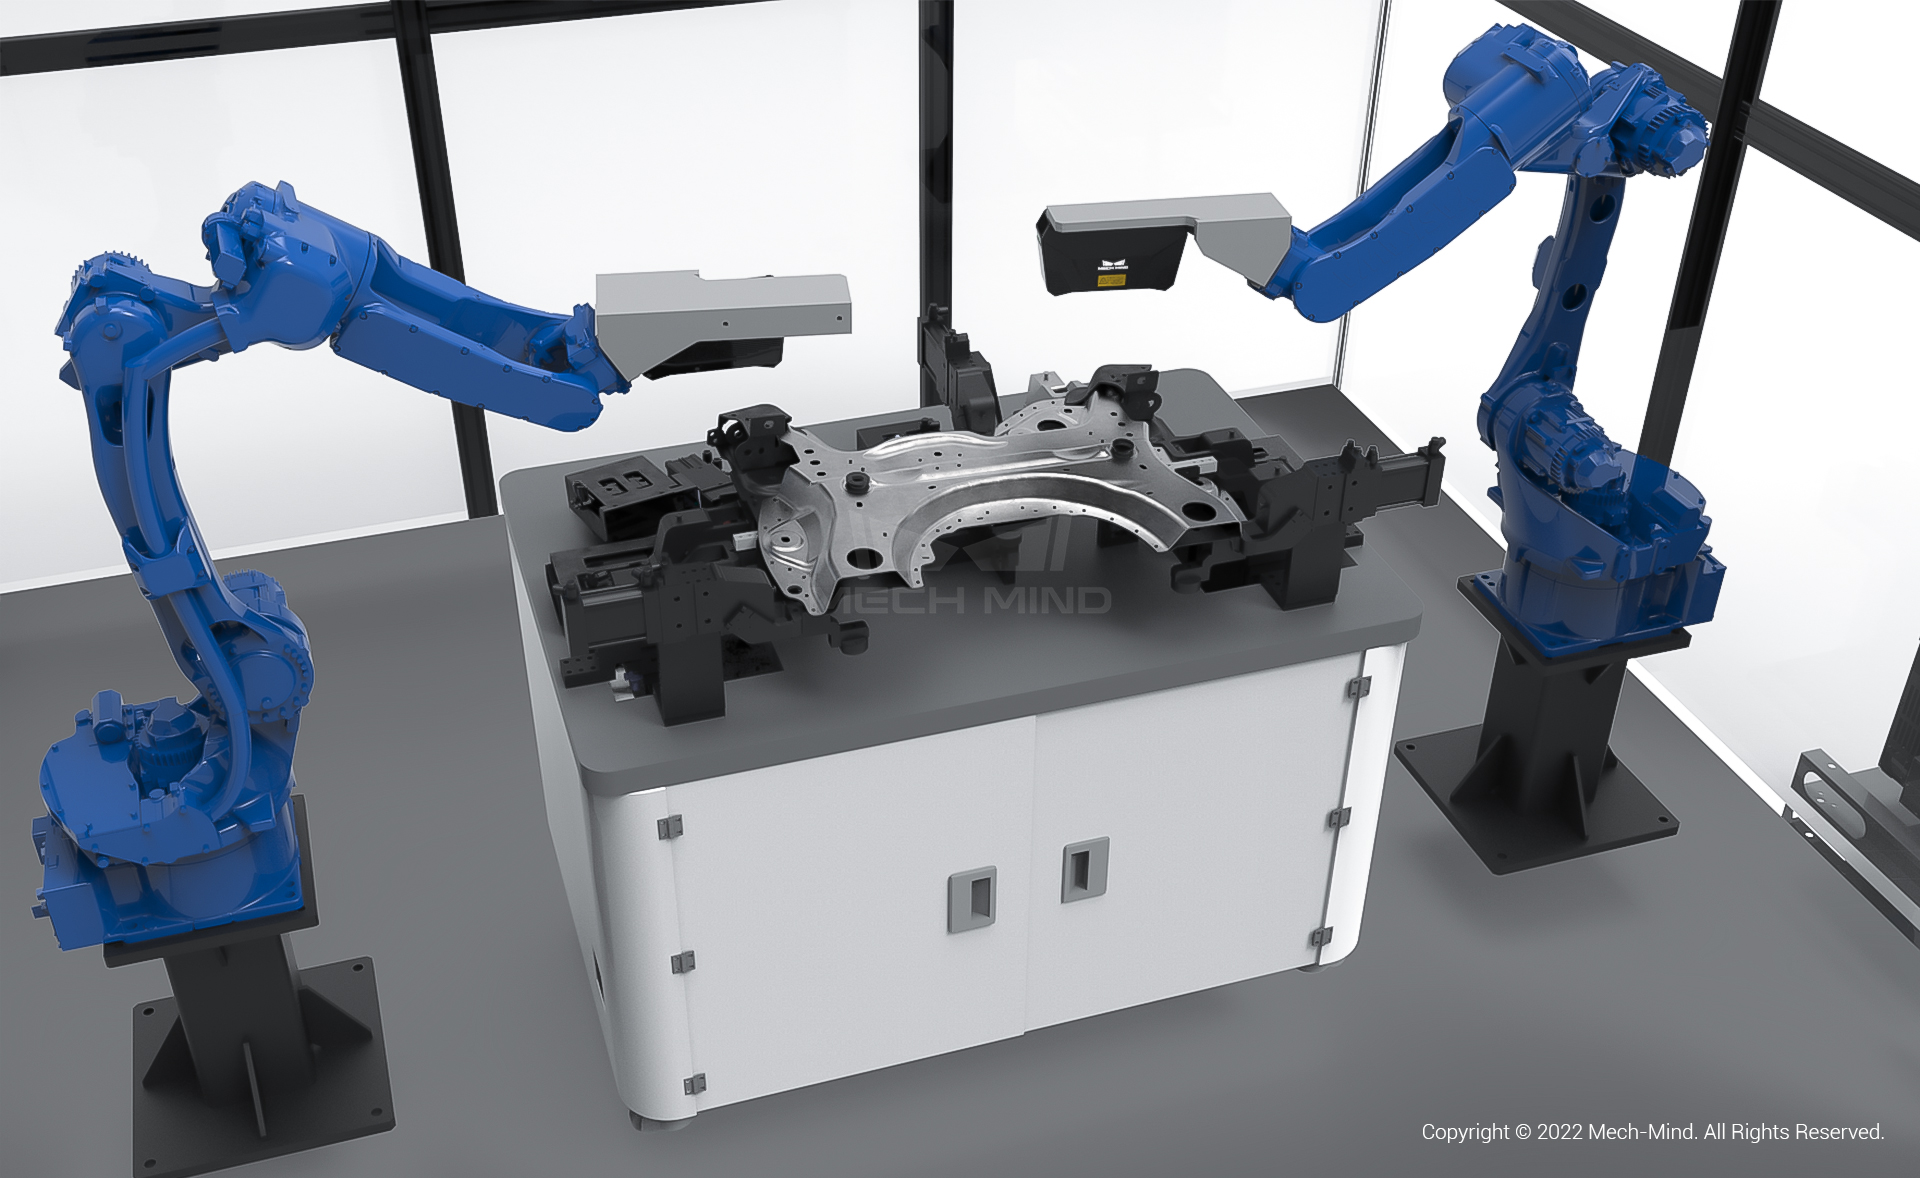
A Large Automotive OEM — Vision-Guided Subframe Measurement
Background:
The customer is a large international automotive OEM. On the subframe assembly line of the customer's welding workshop, it's necessary to measure the key parameters of each assembly feature (mainly including various types of bore diameter, position, flatness, coaxiality, and other form tolerances), which is vital to avoid assembly errors and ensure precise assembly.
Core Advantages:
1. Mech-Eye UHP-140 industrial 3D camera, featuring ultra-high accuracy, can generate high-quality point cloud data for features of the subframes with strong reflection on the surface.
2. With the advanced intelligent measurement algorithm, Mech-Eye UHP-140 can handle a variety of feature types, such as common round holes, threaded holes, studs, waist-shaped holes, etc., with high measurement accuracy.
3. Multi-camera and multi-robot collaboration to flexibly handle different positions of features and quickly complete the measurement tasks of various large parts.
4. Intelligent robot motion planning ensures reliable and collision-free operations even in compact space.
5. The measurement data can be managed and organized, supporting custom filtering history and outputting measurement reports.
Quality control has always been a key part of manufacturing in the automotive and other industries. Good quality control is vital to the thriving of automotive and other industries.
Mech-Eye UHP-140 industrial 3D camera is specially designed for inspection and measurement applications in the automotive industry. It can make quality inspection more intelligent and flexible and help manufacturers in the automotive industry achieve efficient and lean production. In the future, the Mech-Eye UHP series will be launched with more models and deployed in more fields to help customers obtain enhanced inspection & measurement accuracy and further improve quality monitoring capacity and efficiency.
Mech-Eye UHP-140 is now available for online purchase. If you want to get a test camera or learn more about the Mech-Eye UHP series, don't hesitate to contact us at: info@mech-mind.net.